


post filed in:
How to Create a Workflow in Honeybook to Automate, Streamline & Save Time in Your Business
A workflow is a path that describes how something goes from being undone to done. It’s a sequence of tasks and processes that you probably already do each time you start and finish a similar project. However, by writing them all down and implementing them into a Customer Relationship Management (CRM) system, like Honeybook, you’re able to automate much of the process, saving you time and sanity and giving your clients an elevated experience as small things are much less likely to be missed/fall through the cracks.
Some of the most popular CRMs for creative entrepreneurs are Honeybook and Dubsado. Dubsado seems to have even more capabilities, but Honeybook does everything I need it to and is a much simpler, more user-friendly system, which is why many people rely on it to keep their business organized.

PLUS, I’ve got 50% off the first year for you if you want to sign up for a free trial and give it a try!
This post contains affiliate links, which means I get a little cash money if you use it – thank you in advance as affiliate income helps me continue to provide education like this for free!
Here is a video walk through, or if you learn better from text, just keep reading below!
Now, let’s dive in to creating your workflow in 7 steps!! I know this can feel overwhelming at first so just take it one step at a time and don’t try to do it all in one day – be sure to give your brain a break because it’s a lot to think through!
1) BRAIN DUMP every step you can think of for the process you want to streamline!
Start with a blank page or Google document and just write out every single step of the process you can think of. This should include things you already do as well as things you would like to add to the process to give your clients a better experience. Be sure to choose a color and highlight those new things that aren’t currently part of your process as you go so you can easily identify them later on.
Example:
- Send automatic thank you email upon receiving an inquiry
- Check availability
- Call or send video message to inquiry
- Send Pricing Brochure & link to schedule a video Discovery Call
- etc.

2) ORGANIZE your workflow steps!
Go back through everything you just wrote down, tweak to make any improvements, and make sure it’s in the order that makes the most sense. In order to organize well, you’ll need to have a good understanding of how your Customer Relationship Management (CRM) system works. If you don’t currently use a CRM, I would HIGHLY suggest it because otherwise it makes staying on top of the client experience from start to finish nearly impossible. As mentioned above, Honeybook is the CRM I use and adore if you want to get started with a free trial! I have a full blog post on why I love it that includes a video overview of it’s capabilities HERE.
Honeybook has 4 different types of steps you can add to a workflow.
- Create task
- Send email
- Send brochure (what I use for my pricing guide)
- Send questionnaire
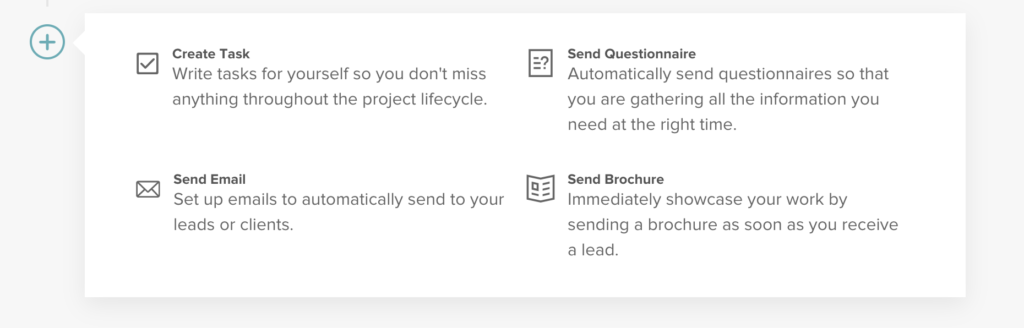
I would suggest adding one of the 4 options above before each step you wrote down after getting it organized (this will make implementation so much easier later on)
Example:
- Send email: Send automatic thank you email upon receiving an inquiry
- Create task: Check availability
- Create task: Call or send video message to inquiry
- Send brochure: Send Pricing Brochure & link to schedule a video Discovery Call
3) ADD NOTES for what CONTENT each step will need to include in your workflow
This could include things like Email Templates, Questionnaires, Brochures, Proposals (which is a contract + invoice in Honeybook), and Educational Blog Posts, etc.
Example:
- Send email: Send automatic thank you email upon receiving an inquiry
- Email Template
- Create task: Check availability
- Create task: Call or send video message to inquiry
- Send brochure: Send Pricing Brochure & link to schedule a video Discovery Call
- Pricing Brochure
- Email Template
- Send email: Thank you for booking! Next steps inside.
- Email Template – Includes:
- What to expect
- Next Steps (planning engagement session, etc.)
- Email Template – Includes:
- Send email: (after booking) Client education 1
- Email Template with link to full blog post
- Blog Post
Sending a proposal or timeline file aren’t currently options you can select in a Honeybook workflow, so for steps that relate to those, you’ll need to create a Task and then when it comes time to check it off, just navigate to the Files section of your client’s project to create the file and send with the appropriate email template.
Once you have added all the content & files added to your list, be sure to highlight any that you don’t already have created – this will become your to-do list and give you clear direction on what to work on next!
4) SET RULES & TIMING for each step of your workflow based on your CRM’s capability
Honeybook has 4 different types of ways to set up each step.
- X # of days after workflow is activated
- X # of days after previous step is complete
- X # of days before Project Date
- X # of days after Project Date
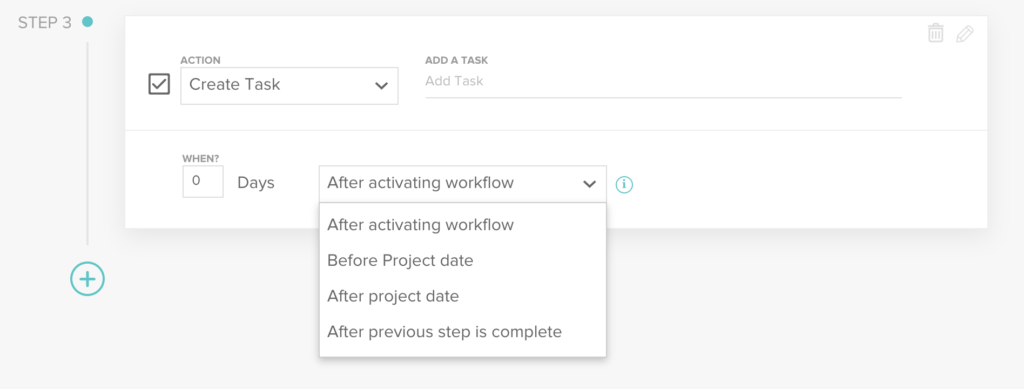
I would suggest using the exact wording your CRM uses when you add these notes so that it’s super clear when you go to implement all of this in step #6.
Example:
- Send email: Send automatic thank you email upon receiving an inquiry
- Email Template
- 0 days after activating workflow (automatic – no approval before send)
- Send brochure: Send Pricing Brochure & link to schedule a video Discovery Call
- Pricing Brochure
- Email Template
- 0 days after activating workflow
- Create task: Host Video Discovery Call
- 3 days after previous step is complete
- Send email: (after booking) Client education 1
- Email Template with link to full blog post
- Blog Post
- 150 days before Project Date
Except for the first task or email, most steps in each workflow will be based on either the previous step or the project date, but if you have “if/then” scenarios in your workflow (ex. If they haven’t booked a Discovery Call yet do this, if they Have booked a call, then do this instead), you will want to utilize more of the “X # of days after workflow is activated” option and just put all of those steps at the very end of your workflow so none of the other tasks rely on you checking those off before they will pop up.
Example:
I have my Inquiry Workflow set up based on the idea that every inquiry WILL book a Discovery Call with me since I encourage them to do so in my first few responses. But I have 3 follow up emails at the end of my workflow that are set to 5, 10, and 20 days after the workflow is activated, so if they haven’t scheduled a call or responded by those dates, I can be sure to send them those follow ups.

5) CREATE your email templates, brochures, pricing guides, and questionnaires in your CRM
Don’t wait to implement your workflow in your CRM until you have every item created. The actual content creation will be the very last step so that you don’t get stuck by overwhelm from feeling like it will take forever to accomplish!
You should be able to create blank templates for each item you want to implement and then you can just update them as you have time to create each piece (see step #7 later on). Often the first inquiry you receive after implementing your workflow is the best motivation to create each piece of content you need to stay on top of it – so you can just create it as you need it for the first person! Be sure to update the template you have saved in your workflow each time though, instead of starting from a different, new one so that the next time someone inquires you won’t have to start from scratch. That is, after all, the whole point of having a workflow!
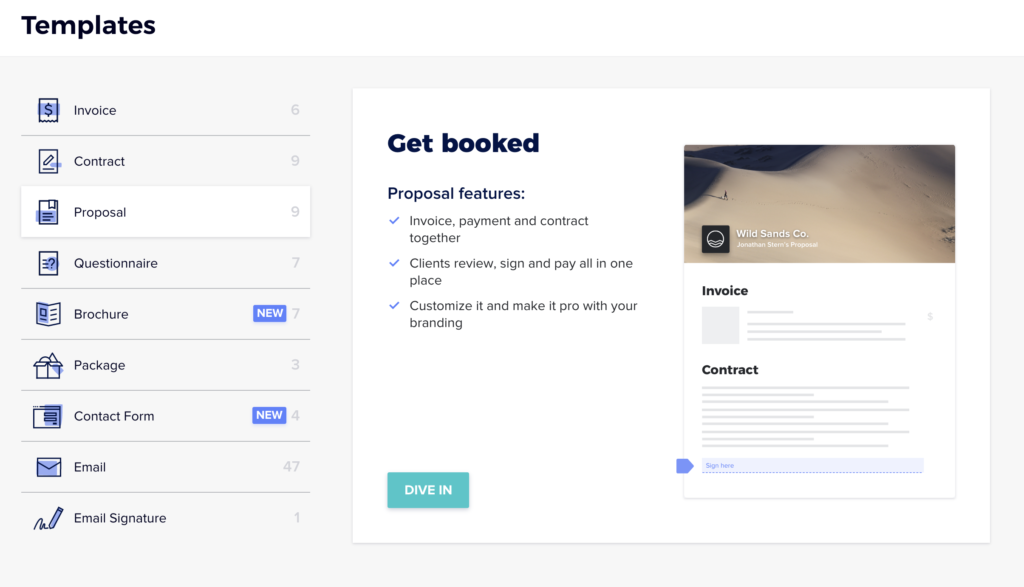
Go to the Templates section of Honeybook and you’ll see each different category of things to create on the left hand side. A proposal is a contract+invoice so I always use those instead of creating contracts and invoices separately. That way you can send them to your clients together in one file and email.
I would suggest either numbering your email templates or starting the name of them with the right section (ex. Inquiry, Engagement, Pre-Wedding, etc.) in order to keep them organized.
6) IMPLEMENT your workflow into Honeybook or your other CRM
Be sure to complete step 5 before jumping to the implementation. You will have to select which questionnaire/brochure/email template you’d like to use for each step of the workflow, so it’s easiest to have all of them created before trying to implement everything. Like I mentioned before, don’t get stuck on that if you have a lot that needs to be created, just create a blank template or file, give it a clear name, and you can fill it in later/as you go!
Go to the Workflow section under the Tools dropdown in Honeybook. Create a new workflow and follow your document to choose what type of step with what file/email template or task name, as well as the timing.

I separate my wedding process into three separate workflows:
- Wedding Inquiry Workflow
- Wedding Booked Workflow
- Post-Wedding Workflow
When an inquiry actually books with me, I remove the Inquiry Workflow and apply the Booked Workflow. Then immediately after the wedding day is over, I remove the Booked Workflow if there are any remaining steps (which there shouldn’t be if I stay on top of it and follow each step) and apply the Post-Wedding Workflow! If you have an assistant or intern or photo editor who will be in charge of some of the post-processing steps, you may consider moving your Post-Wedding Workflow into a separate task management system like ClickUp or Asana since you aren’t currently able to assign tasks to other people within Honeybook.
7) Pull the highlighted content into a separate document to create your to-do list!
If you followed my suggestion, you highlighted each piece of content that still needs to be created on your workflow outline document. Go ahead and copy/paste JUST those items/sections onto a different document and this is now your to-do list for what you need to create & add to the blank templates in your workflow!
If you prefer to just view your master document and remove the highlights as you create + implement each item, that would work wonderfully as well. It just feels less overwhelming to me to look at a small list of things to check off rather than viewing them all mixed in with the entire workflow.
Between the three stages of my wedding workflow, I have 70 steps that help keep me on track and save me tons of hours of time, provide an elevated client experience, and give me an incredible peace of mind knowing that I don’t have to remember every detail of the process for each client off the top of my head. They are so much more taken care of this way and I’ve actually received better referrals after implementing my workflow because of how valued they feel throughout the process with great communication & client education mixed in!
QUESTIONS?! STUCK ON SOMETHING?! Come join my free educational Facebook group and ask away – I’d be happy to help!

the list
Be the ultimate insider. Get updates on my latest shoots, tips for planning your dream photo session & where I'm headed next. My email subscribers always hear about big updates before anyone else!
JOIN THE FUN

education Community
Are you a creative entrepreneur? Come join my small but mighty education community, where we are learning and growing together! I'm an open book and love to share about all the photography & business stuff behind-the-scenes stuff here!
Let's Grow Together!